Feeding Frenzy

A professional gastronaut feeds the blogosphere with tales of his culinary adventures - sometimes on-the-job, sometimes just-for-the-hell-of-it.

Thursday, August 20, 2009

Cheese Crunchies

When we were kids, my best friend Bob Meyer and I created a snack by frying Rice Chex with our parents’ best cheddar. We called the snack “Cheese Crunchies”. Bob’s mom said we couldn’t make it at their house anymore. The smell drove her crazy and it made horrible mess out of her sauté pan. Also, she was probably annoyed that we used so much of her good cheddar. My parents were pretty used to me making messes in the kitchen by this time so we made it at my house after that.

I still love crunchy cheesy things and I’m pretty sure I’m not alone. Both of these recipes came from Feeding Frenzy.

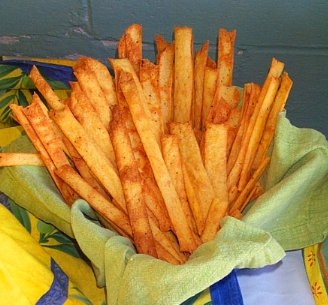
The first one, Cheddar Straws, is a variation of a snack I first had in Davenport, Iowa. My ex-wife’s grandmother Kate used to make these things. This isn’t her recipe. It’s an adaptation of an adaptation of one I found in the back of a Gourmet magazine in the 80s.

Kate never used a food processor. I never watched her make these, but she’d have cut the butter and cheese into the flour with a pair of knives – or perhaps a pastry blender.

Feeding Frenzy customers often said, as they stuffed these into their mouths by the handful, that they were like the best Cheez-its ever. I’m pretty sure that this was intended to be a compliment.

These things are a lot of work. They’re worth the effort.

Cheddar Straws


2 cups unbleached all-purpose flour
1 teaspoon salt
1 pound of the best, sharpest cheddar cheese you can find, grated
4 ounces unsalted butter, cut in 1/4" pieces cubes, COLD
dash chipotle powder or piccante Spanish paprika
5 tablespoons ice water

In a food processor, process the first 5 ingredients together with the metal blade until the mixture has the consistency of bread crumbs.

With the food processor running, add the ice water and process just until it forms a dough that holds together. Add more water only if necessary. In fact, if you don’t need to add the full 5 tablespoons of water to get the dough to hold together, don’t.

Turn dough out onto a board. Working quickly, tear off a chunk of dough about the size of your fist. Flatten it and set it between two good-sized sheets of wax paper. Through the wax paper, roll the dough out fairly thin – as thin as you can without the dough tearing or becoming translucent. Leave the rolled-out dough in the wax paper. Repeat the process until you’ve done this with all the dough.

When you’re done with the rolling-out, wrap the dough (wax paper and all) in plastic cling wrap and refrigerate it overnight, if possible – but at least for 2 hours.

After the dough has thoroughly chilled and rested, get it out of the refrigerator and remove the cling film.

Again, you have to work quickly here. Set one piece of rolled-out dough on a cutting board, remove the top sheet of wax paper and using a pizza cutter or a pastry cutter (or a sharp knife if that’s all you have), cut the dough into 1” strips.

Transfer the dough strips from the bottom sheet of wax paper to a COLD, greased cookie sheet. You can put them fairly close together on the cookie sheet because there won’t be much spreading as the cheddar straws bake. Repeat this until you’ve used all your sheets of dough (or until you’ve run out of cold cookie sheets). Return the filled cookie sheets to the refrigerator until you’re done with this process.

If you don’t have enough cookie sheets to transfer all the dough strips at once, you’re going to have to bake them as you go. In that case, cut only as much dough as you are ready to bake at a time and return the remainder to the refrigerator. You’ll have to wait to cut and transfer more dough strips until your cookie sheets have had a chance to cool completely – COMPLETELY. Cool them in the refrigerator, if possible.

It’s important to keep the dough and the cookie sheets cold until they go into the oven. If they aren’t kept cold, the cheddar straws won’t be crisp and that will be hideously disappointing.

Bake the strips, one or at most two pans at a time for 10 minutes in a 400 degree oven or until golden brown. If you bake two pans at once, switch them halfway through baking to ensure even browning.

When the cheddar straws are done, remove them from the oven and transfer them (carefully – a fine metal offset spatula is good for this) to a rack to cool completely. It’s important that they cool completely before you store them, otherwise they will lose all that precious crispness you worked so hard to achieve. Store these in an airtight container. I suggest you make these no more than a day in advance – if possible, bake them the day you intend to use them.


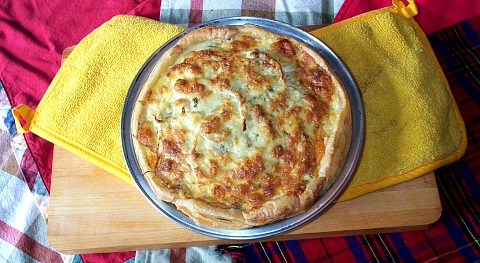
As I’ve written elsewhere here, when I first came up with the idea for Gorgonzola Shortbread, I thought an original idea. Then about 10 minutes later, I Googled the name and found a page of entries discounting my claim of originality. Whatever.

We used to serve these with a sun-dried tomato relish. Fabulous. The yield is roughly 72 shortbreads if you use a 1.5” cutter.


Gorgonzola Shortbread


1 pound gorgonzola cheese, crumbled (use Gorgonzola Piccante or domestic Gorgonzola for this. Gorgonzola Dolce is too creamy)
4 ounces cold unsalted butter, cut into 1" cubes
1/2 teaspoon salt
pinch chipotle powder
3 cups all-purpose flour

Combine the above in the bowl of a food processor. Pulse until roughly the consistency of bread crumbs. Alternately you can cut the ingredients together with two knives or a pastry blender. Either way, the end product should have that bread crumb consistency.

Add just enough ice water (without the ice) by tablespoons until the dough can be gathered together. The more water you add the longer you’ll have to bake them.

At this point, the dough will be a depressing greenish grey. Don’t be discouraged. This is still a good idea.

Pat the dough out to a 1/4” thickness and cut with a round 1.5” cookie cutter. Transfer shortbreads to an ungreased cookie sheet.

Bake at 225 degrees for an hour and a half (or even longer - until they're fairly dry). You bake them at this temperature to dry them out without browning them too quickly. This achieves the lovely shortbread texture that we’re looking for.

When the shortbreads are nice and dry and just a little brown, transfer them to a rack to cool completely before storing in an airtight container. Again, it’s a good idea to wait to bake these off until you’re ready to use them, but you may bake them the day before without losing too much of that lovely dry, shortbread-y texture.

Thursday, August 06, 2009

Hot Dish Macaroni and Cheese


Margaret McGlothlen (my mother) took eleven years off from working at the bank to raise me through what she and dad figured would be my formative years. During this time she forced herself to cook. She hated it and she wasn’t very good at it. In fact, she was a pretty bad cook. She was usually comfortable with how bad a cook she was except when she felt she had to entertain guests with food. When that happened, she was at once frightened and cranky.

One of a handful of dishes she could make infallibly and without a recipe was Welsh Rarebit. If you’ve made that dish then you know how weird it is that a non-cook would have success with it above all others because Welsh Rarebit breaks* easily. It breaks so easily that hardly anybody makes it anymore. Hers never broke. Ever. And she made it traditionally, which is to say that hers was only stabilized with a bit of egg yolk and contained no starch.

Welsh Rarebit (hers anyway) is a beer-flavored cheddar sauce served over toast points, crisp strips of bacon and tomato slices. That’s the way she made it and it still gives me pleasurable goose-bumps to think about it.

Well. She was and is my angel. I miss her and I love to talk about her. This dish is one of the ways I talk about her. When I was creating the formula for Hot Dish, I did it with her in mind: I added beer to the cheese sauce in tribute to her Rarebit.

On a more, you know, self-aggrandizing note, Rebecca Denn of the Seattle PI named Hot Dish’s Macaroni and Cheese the best in Seattle. This was in an article about the state of Mac and Cheese in our area restaurants, which she generally deplored as either too fussy or too bland. She loved ours. That was a pretty exciting day around the shop. I wish I could have found that article online but no luck.

Hot Dish Macaroni and Cheese


-for Margaret

1 pound penne pasta
½ cup unsalted butter
½ cup flour
2 cups whole milk
¾ teaspoon salt
1 teaspoons Spanish Paprika (smoked, “piccante”)
1 pound extra sharp cheddar cheese, freshly shredded
½ cup beer (pale ale)
½ cup bread crumbs
¼ cup parmesan cheese, freshly shredded
½ teaspoon Spanish Paprika (smoked, “piccante”)
1 tablespoon olive oil

Preheat oven to 350 degrees F.

Cook pasta in plenty of rapidly boiling, salted water until al dente. Set aside.

Melt butter over low-to-medium heat. Add flour. Cook flour and butter to make a blond roux. I like to cook roux for 5 – 8 minutes, so this is done slowly. It shouldn’t get brown, only tan. It’s important to cook the roux thoroughly, though, so as to minimize the flour taste in the sauce.

Whisk the salt and paprika in a little bit of the milk until the seasonings are well-dissolved. Stir this into the rest of the milk and add this resulting mixture to the cooked roux. Raise the flame to medium heat and cook as for a very thick, smooth béchamel (white sauce, n'est-ce pas?).

Add the cheese in small portions, whisking thoroughly after each addition. Add the beer.

Combine the cheese sauce and pasta. Smooth this mixture into a greased casserole dish.

Combine the final four ingredients. I like to use home made bread crumbs for this now, but at Hot Dish we used store bought (yes, the stuff in the big cardboard tube). Sprinkle this mixture over the macaroni and cheese.

Bake for about half an hour or until golden brown on top. Don’t over-bake it. It’s possible that the cheese sauce will break* if you do that. Really.

If you truly want to honor my mother, get yourself a bag of miniature chocolate bars – the size you give away at Halloween. Milky Way or Mars Bar. Take one of the bars out of the bag and cut it into fourths. Wrap three of those pieces of candy bar individually in cling wrap and store them in the refrigerator. Eat the fourth piece for dessert. That’s what Margaret would have done. Usually while playing solitaire at the kitchen table.


* A cheese sauce is said to break when the fats and solids in the sauce separate and leave a gloppy mess.

Sunday, August 02, 2009

What's For Breakfast (part two)


Feeding Frenzy In The Morning


Breakfast food cookery came slowly and of necessity to Feeding Frenzy. It wasn’t a specialty in the beginning. In fact, at first I didn’t think much about breakfast foods but the demand grew and over time we got pretty good at it. We had lots of regular breakfast business clients. Some of them continued to call literally years after Feeding Frenzy ceased operations as a catering company.

There were a few Feeding Frenzy dishes that found their way onto the Hot Dish menu: the olive oil carrot cake, the rice-and-cheese balls (actually called “bolinhos de arroz” and we served those at Brasil, too), the tomato soup, the hummous and, of course, Bob Dip. But probably the most useful Feeding Frenzy item to find a home at Hot Dish was the cream scone.

We sold a fair number of scones at Hot Dish, but mostly we used them as pacifiers. On Saturday and Sunday mornings, the length of time that customers spent waiting (for seats, for orders) could be pretty awful. But a grumpy family could be placated with a plateful of free scones as if by magic.

We got this recipe from Bernard Clayton’s lovely book “Complete Book of Small Breads” (1998). The job of making Feeding Frenzy scones somehow always fell to Craig and he can make them in his sleep now. The instructions here are basically his – and clearer, I think, than the original. The addition of orange zest was a Hot Dish elaboration. I’m not sure who suggested it first but it was a brilliant idea, although these are pretty amazing without it as well.

My final admonition before diving in is this: don’t overcook the scones. Soft and even a little doughy is better. These are cakier than the scones you're probably used to.

Cream Scones


2 cups all-Purpose flour
½ cup cake flour (“Softasilk”)
½ cup sugar
2 teaspoons salt (fine sea salt preferably)
1 tablespoon baking powder
2 tablespoons orange zest
8 ounces butter, unsalted, cut into cubes
3/4 cup heavy cream, chilled
1/4 cup milk, chilled
3/4 cup currants
1 egg, beaten with 1 teaspoon cream, to glaze

Craig always does this in the food processor. The mixture must be done in quick, short bursts to keep the particles intact, not blended into a solid mass. You can also cutting the butter into the dry ingredients by hand (which is a neat trick involving two knives). Once you’ve done that, you can finish mixing the scones by hand or with a mixer. But these directions are for the food processor which makes the whole thing quite easy.

Measure the dry ingredients into the work bowl of the food processor. Pulse to blend.

Scatter butter cubes over the flour mixture. Pulse until it all has the consistency of bread crumbs.

Pour the liquids through the feeder tube while pulsing the processor. Stop immediately when the dough forms a ball and cleans the sides of the bowl. Immediately. Craig says “immediately” and he MEANS immediately. If you go past this point you'll have what our lovely friend Mara used to call "scookies".

Do not knead. Dough will be soft and moist. Place on floured work surface.

Spread the currants over the dough and work in by hand. Flatten the dough into a 1" thick sheet by hand or with a rolling pin.

Use a floured dough cutter to cut out the scones and place them onto a greased cookie sheet.

Brush with egg wash. Cover the scones on the cookie sheet with plastic wrap, making sure not to leave any scone-y surface exposed to air. Refrigerate them overnight (or at least two hours) to allow the dough to relax.

Remove plastic and re-apply egg wash.

Bake at 400 degrees for 20-25 minutes.

When they're done, which is to say golden on top and a little darker on the bottom, take them out of the oven and place them on a rack to cool. Scones are VERY FRAGILE when hot.


My favorite egg dish is a Tapas dish and is called Tortilla Espanola. It’s often served in the afternoon, but I love it for breakfast. Basically it’s a sort of potato frittata.

The ingredients are simple:

2 pounds of waxy potatoes such as Yukon gold potatoes
2 tablespoons of finely chopped onion
Olive oil
6 eggs
Salt to taste.

The instructions are tricky. Slice the potatoes into really thin coins – 1/16” thick. Use your mandoline if you have one.

The next step is to cook the potatoes. I usually sauté/fry them with the onion in olive oil until they’re golden brown. Recently, though, I read an old Spanish recipe that called for deep-frying the potatoes instead. Genius. That would be perfect. My potato coins would be uniformly brown and crisp.

If I did deep fry them, I’d sauté the onions separately and add them to the potatoes later (after the potatoes are fried, obviously).

Either way, drain the potatoes and onions well. You can reserve the olive oil. Let them cool a bit (but they don’t have to be cold for the next step).

In a bowl, beat the eggs with enough salt (somewhere between a teaspoon and a teaspoon and a half is right for me). Add the potatoes and onions and mix well.

Fire up a clean 8-or-9-inch frying pan (a heavy-bottomed one with rounded sides works best) with some of the reserved olive oil – enough to coat the pan. You want it fairly hot but not smoking.

Add the eggs and potatoes to the pan. It should sizzle – a lot. If it doesn’t sizzle this won’t work. Now that you’ve got the eggs in the pan, it’s almost as though you’re making an omelet. Shake the pan to keep the eggs from sticking. Keep the eggs moving and not sticking. You can run a rubber spatula (actually a high-temp silicone spatula) around the edges, lifting a bit. Do not STIR the eggs.

When the tortilla is golden brown on the first side, take it off the heat. Place a nice, big plate (with a larger diameter than the pan) on top of the frying pan and invert the contents onto the plate. The less-cooked side should be face down on the plate. Now add a little more olive oil if needed and slide the less-cooked side back into the pan, still face down. This can be a messy step. Be careful.

Cook that side until it's golden brown, too. Serve it warm. Serve it cold. Serve it room temperature. A little fresh ground pepper over it. Serve it any way you like but serve it to me, okay?


Torta 42nd Street


This is an invention of mine. It’s a rustic torta. I didn’t invent rustic tortas but I invented this one. What’s a rustic torta? It’s sort of like a composed quiche. VERY simple. Incredibly popular dish from Feeding Frenzy. I made it at a party recently and as usual it disappeared.

Prep:

Preheat the oven to 375 degrees.

3 Granny Smith or other tart baking apples – core, peel and slice them into 1/8” rings.

1 sweet onion. Peel and slice this into 1/8” rings as well.

½ pound or more of a crumbly gorgonzola cheese – preferably real Italian Gorgonzola Piccante, but we used to use domestic for business and people loved it anyway.

3 eggs, a cup of heavy cream and salt and pepper to taste. Whisk these together in a bowl. Beat them until frothy.


Instructions:

Line a well-greased 9” tart or pie pan with puff pastry. I use store bought puff pastry. Don’t be a hero. Be like me. Use the store bought. I get mine at work. Good stuff. Leave it on the counter for a few minutes and it will be thawed enough to work with. When lining the pan, the edges of the pastry don’t have to be smooth or fluted or anything. With puff pastry, ragged edges look cool and handmade. By the way, the one in the photograph was made using a pie plate. I inevitably use a tart pan instead now. Much prettier.

Into the lined tart shell, layer half the apples, half the onion and then half the cheese. Repeat. It’s nice if you can do the layering in a pretty, tartlike way, but don’t sweat it. At the end of the layering process you should have a nice, tall mound.

Now, carefully and slowly, pour the egg mixture over and into the layered ingredients. Carefully and slowly because it's so easy for all the egg mixture to end up all over your counter. Let the egg mixture find all the cracks and crevices. If you need to, lift some of the top layer of filling up a little bit to allow it to distribute more evenly.

Bake in the preheated oven until golden brown and well-set – it can take 40 to 45 minutes, depending upon your oven.

I like this best at room temperature. Craig likes it best hot out of the oven.

The basic template (lined tart or pie pan filled with stuff and bound with beaten egg) can be used for almost anything to good effect. Use your imagination.

And don’t forget about breakfast. Most important meal of the day. Until lunchtime.

www.feedingfrenzy.net

It's a frantic, hungry world.
We're feeding it -
one party at a time.

Powered by Blogger